Guitar making blog, Richard Nice Guitars,
I specialises in making individual guitars to customers’ specifications. You will notice that I don’t have a range of guitars that I make and then customize and sell to you. My approach is that I make your guitar from scratch to your specifications and style. In making custom guitars it is all about finding out what the customer wants. You Dream it, I build it, You Play it! Website richardniceguitars.co.uk
Wednesday, 8 February 2012
Clamping up soundboards and guitar backs.
NY34HQVBRBJ5
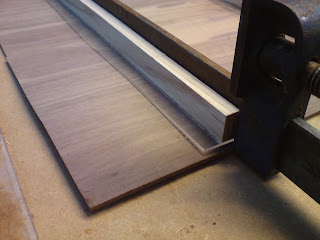
Here's my way of clamping up soundboards and guitar backs. I use some a flat board of MDF which has a film of book cover plastic suck to it. The glue will not stick to the film. Sash cramps are used to apply pressure to the joint and the weight of the cramps holds the boards flat. Note that the bottom of the sash cramps are used not the top. I have made three shoes that slide onto the bar of the sash made out of acrylic sheet and wood stuck together with double-sided tape. To make a strong fixture clamp the the pieces that are tape togehter in a vice and apply pressure and you will be surprised how strong the joint is. The shoes also hold the sash cramps upright as well as applying pressue to the boards keeping them flat. Any glue will not stick to the acrlyic sheet. hopefully the sideshow will reveal all. My website is http://www.richardniceguitars.co.uk
Saturday, 4 February 2012
Low Angle Jointer for Guitar Soundboard and Backs
Jointing Guitar Soundboards and Backs
It is essential to have a good joint when gluing up fronts and backs. Here I have used two contrasting woods to show what a good joint straight from the plane. I have a large jointer but wanted a low angle plane for a particular job and as low angle planes of a sufficient length are a ridiculous price I made a quick simple and very efficient plane to do the job. The overall length is 380mm 190mm to the mouth. I just used two planks of 10mm mahogany stuck together for the body. I also added a maple sole to be harder wearing. The wedge is of wenge, note the scallop on the wedge to allow clearance for the shavings. The plane is set at an angle of 20 degrees. The reason that there are two slots is that I can also use it as a scraper plane.
Sunday, 22 January 2012
Guitar Making Books
This is a very good book as it covers not only classical guitars but also steel stringed guitars so if you can only afford one book then go for this one. It has lots of clear line drawing and plenty of black and white photographs. With most things covered in great detail. approx 385 pages.
Based on a Steel Strung Acoustic Guitar this book has a set of full size plans at the back. Once again in colour with clear coloured line drawing this is a must for anyone building a steel stung guitar. approx 160 pages.
A great book for anyone who is looking to build an electric guitar in colour with a set of full size plans. I like the very clear drawings. approx 144 pages.
Chapters covered are Cleaning,installing strings,neck,set up,intonation,tuning head, electric guitar bridges, tremolos etc etc loads of good information. Only down side that it is in black and white photographs. approx 320 pages.
The electric guitar book that most people turn to. Black and white photographs and drawings. approx 106 pages.
Melvyn's latest book on acoustic guitars in colour. Nice chapter on a visit to the Martin factory. Also a chapter on Resonators. Even a chapter on using reclaimed materials. approx 280 pages.
Thursday, 19 January 2012
Stripping Antique Furniture
| There are three degrees of stripping furniture. 1. A good clean to remove the dirt and wax built up over the years by using half a pint of white spirit and half a pint of vinegar with five tablespoons of linseed oil. Shake the mixture as you use it and use a clean cloth. Replace the cloth as it gets dirty as you go with a clean cloth you will be surprised. 2. The removal of the finish from the wood, but leaving the mellowed wood intact, where the finish is marked, scratched, etc. This can be done best with methylated spirits and fine oooo wire wool which will work on 90% of antique furniture, the remaining 10% can be removed with paint stripper. There are time when the finished can be restored either by adding polish to a scratch or by buffing the finish with a mild abrasive. (like pumice or rottenstone etc) |
3.The mellowed wood is the top surface of the wood which has been faded by natural light, this faded look is 95% of the patina, the other 5% is the finish e.g. the aged French polish or aged wax polish. N.B. It should be noted that all woods are affected by natural light to a greater or lesser extent, as a general rule all light woods darken and all dark woods lighten so they all end up nearly the same colour. The golden rule is NEVER EVER SAND THIS LAYER if you do you will create a nightmare to put right. This is because the mellowed wood is faded once you sand thought it the true colour will emerge and literally swear against the mellowed wood. Woods which redden are :-cherry, yew, beech, kingwood, purpleheart, padouk, Woods which yellow are :- African mahogany, sapele, walnut, agba, gaboon, maple, plane, sycamore, oak. This mellowed wood should only be removed as a last resort as it is very difficult to make good or fake. But there are times where a repair has been carried out and the surface has been lost, such as when sanding down the new wood flush with the old. This faded look can be achieved by bleaching the wood with either a two pack bleach or a single stage bleach. |
Sunday, 15 January 2012
French polishing tips for dummies
Note, Dry, The polish is dry to touch but not hardened off. On average this takes ten minutes to dry in a warm dry place.
Hardening off, several days for all the solvents to evaporate out of the polish. The more polish you put on quickly the longer the polish will take to harden off as it has to penetrate the layers of polish on top of it. As the polish hardens off the polish sinks into the wood, actually it is the solvents evaporating that gives it the appearance that the wood is absorbing the polish. People say the polish has sunk! It has not the solvents have evaporate and it appears to shrink
Make a jar with a brush suspended in it, a blusher brush for ladies make up can be good. Only use polish from one source, by this I mean don't mix button with pale polish. Don't put separate polishes on top of each other they can react as they may have different solvents in their formula. This might sound obvious but don't use one rubber for all polishes. Keep a separate rubber for each type of polish. If you start a new batch of polish start a new rubber. Rubbers are better when they have been worked in. Use a fine cloth for the cover and cotton wool. Make your rubber the size of your hand. It should fill the palm of your hand comfortably,When held in the fingers this is important and often overlooked in books etc. The reasons are, that it is easier to hold in the fingers giving you more control. Also a larger rubber holds more polish so you keep your rhythm going and don't keep breaking off to recharge the rubber. The advice is that you cannot get into the corners with a big rubber. Rubbish, what counts is the shape of the rubber especially the toe. There are occasions when you need a small rubber say for a bridge where size does matter but the old saying the bigger the better still applies.
My Oilless French Polishing technique as follows.
Sand the wood as normal so it is smooth and flat. Brush on a coat of polish to seal the grain and highlight any defects. Fill the small defects with wax stopping etc. Sand back the polish HARD with 320 lubasil. Wipe off sanding dust with your hand. Don’t use a woollen jumper or wear one or you will have hairs all over it. You can of course use a tack rag to clean the dust off. This fills the grain and smoothes the surface ready for repolishing. Brush on another coat and resand, when dry allow ten to fifteen minutes between coats depending on temperature and humidity. Do this three or more times depending on the porosity and grain of the wood used. Once the wood is sanded look at it carefully, if it is covered in shiny pockets carry on brushing and sanding until the wood looks matt all over. The polish will sink in anyway after it has hardened off. Charge your rubber with polish use transparent or HL polish from a good supplier, Jenkins or Mylands etc. Don't bother to make your own its not worth the hassle and is not forced to be as good. Leave it to the experts. I thin the polish slightly with 10 percent meths in the jar before applying to the rubber. The rubber wants to leave a wet trail on the surface with a light pressure applied. Leave 24 hours to dry before burnishing. Never stop with a rubber. Always fly the rubber like glider on and off the wood. No Harrier Jump Jets. Just rubber it up, by wiping it over and leave a wet trail. Work with a wet edge and if you miss a bit leave it until the next pass and make sure you get it then. Don't try and body it up without oil (you can if you know what you are doing) you will just drag the finish. It is important not to go over the same ground because you will take off the polish you just put on. Let the polish dry 10 minutes before repolishing. I know it is just a case of wiping a wet rubber over the surface to build up the finish but it does work. Do try it for yourself in front of the TV, any channel with adverts! No BBC! As soon as the adverts come on give it a polish and leave to dry until the next advert. Repeat the process again and again until you are satisfied with the finish. Never, never, never, ever let the rubber stop on the surface.
Always finish rubbering with the grain. Can be a problem on Burr walnut!!!!!
I do use oil when I want to build up a finish very fast and I’m not worried about it hardening off. I was taught the traditional method, of grain filling, bodying up and flattening off etc but the OillessBodying up = just wiping over with a wet rubber and a light denib. Flattening off is the same as is spiriting off or stiffing out. The advantages are no oil, thus a faster drying and hardening off time. Speed, no grainfilling which I like as the polish and sanding dust gives a perfect match to the wood giving the wood a greater depth. I forgot to mention the sole of the rubber should be flat rather than rounded. I had better point out that the "whack it on and sand it down hard method" is only on the brushing stage, the rubber stage is just a light denib I would respectfully suggest you use the oilless technique on a board 2 to 3 square feet to get the hang of it. Like with any technique it requires practice. One of the hardest problems is to leave a gap when you miss it. Just bear in mind to cover it on the next pass. The problem is that French polishing is treated as a black art and there are a lot of so called experts who have never used a rubber in anger. They never earnt a living from it. I always remember a good piece of advice someone told me years ago "if someone tells you something and it makes sense, try it out for yourself. If it works for you keep it, it not discard it" I know that this works.
What can go wrong.
I gave this advice to someone who complained to me that it did not work I asked a few questions and found out that he had the polish in a jar in his garden shed in full sunlight for over twenty years! It’s a wonder it came out of the jar at all! I respectfully pointed out that he need to invest in a new batch of polish as his had gone off! He did and has been happily polishing ever since.
Saturday, 3 December 2011
Hinged pin router for dremel and 43mm collar routers
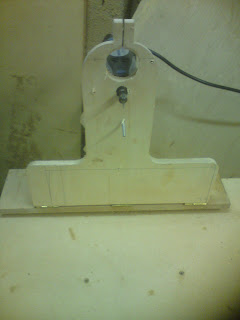
Here is a useful tool I made recently a hinged pin router for Dremel and 43mm collar router. The photos should speak for themselves. Router in the down position.
The table is 20" by 18" and the pin is 12.5" from the edge. Router in the up position. you can also see the height adjustment under the router cuter which is a 4mm threaded rod.
I extended the hinged arm to get a sound board under the router.
It is also has a height adjustment at the back for thicker boards.
The router is a 2mm dia with a 2mm dril bit as the pin. Fix the template to the underside with double sided tape. In use put the router down and adjust for height and switch on, the weight of the arm is enough to force the router into the wood. If you need any more information email me at richardniceguitars.co.uk
Subscribe to:
Posts (Atom)